Peg People Tutorial

IMG_7543

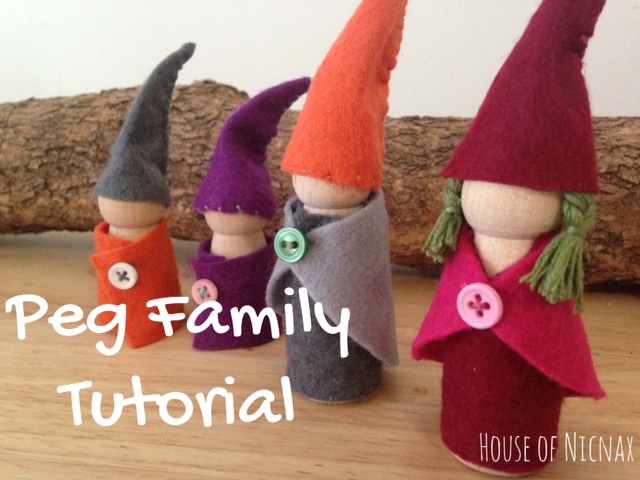
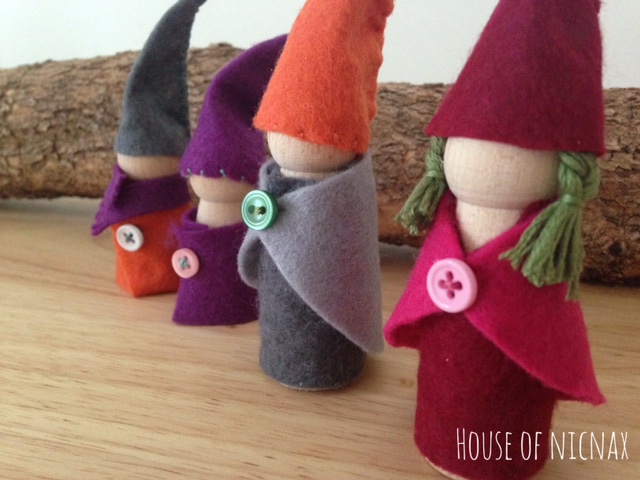
Little peg people are so much fun to make (and play with!)

This is a project I have wanted to do for a little while now – but the thought of painting faces kinda put me off. So after having a think about it – I decided not to paint them. I think they still ooze character and have their own personalities.

The clothes were super simple to make – and I’m wishing I’d made these ages ago! (Why did I wait!?!)

If you would like to create your own Peg Family you can buy the kit here, otherwise –  here’s how to do it:
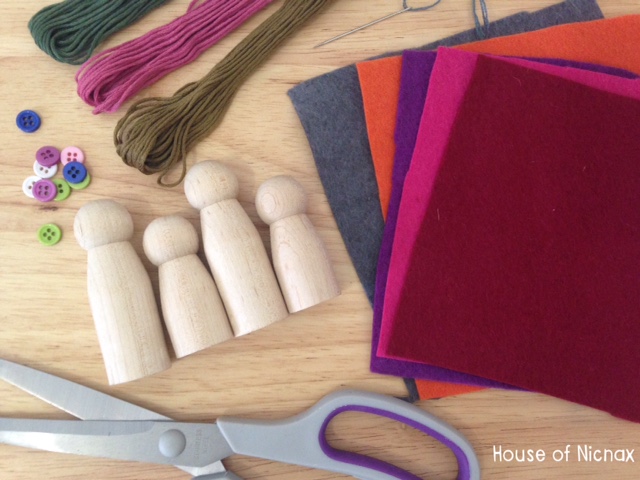
What you need:
– Family of Wood Peg People
– Selection of felt
– Buttons
– Needle and thread (I use embroidery cotton)
– Scissors
– Glue (optional)
IMG_7536

What to do:

From your squares of felt, cut out some simple shapes to transform into the clothing pieces  for each family member.

Simple rectangles and semi-circles work well for clothing. I used a long skinny rectangle as a scarf. You’ll need to test them on your peg dolls to make sure they fit. (much like real people, peg sizes can slightly vary in height and width!) Adjust if needed and once your happy with the size you can continue.

IMG_7537

Wrap your doll in the clothing piece and secure with a stitch or glue. Add a button for embellishment if you wish.

** Tip- When adding the scarf, be gentle. I played with mine way too much and the fringe started to break!

IMG_7538

To make the hat, fold the triangular shape in half long ways. Stitch along the long side. I found if you pull the stitches tight as you go, it gives a cute little bend to the hat.

You could also add a bead or bell to the top for a cute little pixie look!

To attach the hat to the head, add a tiny bit of glue to the head, and stretch the hat over the top.

** Tip – If you choose to add a decorative stitch around the base of the hat, this will decrease the stretchiness of the felt. Maybe make the hat slightly larger to ensure a good fit.

IMG_7539

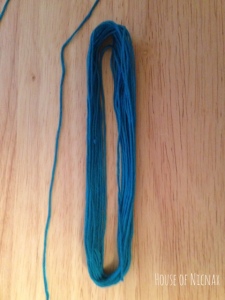
To give my dolls hair, I simply plaited some embroidery thread and secured with glue. The hat for this one had to be made slightly bigger to fit over.

IMG_7542

And that’s it! You now have your own peg family to love and care for!

IMG_7541

Let me know in the comments what you think about the faceless family. Do you think they still have character? Or do you think they look unfinished?

And if you have created a peg family, please attach a picture of link – I’d love to see them!

Thank for stopping by – and Happy Crafting!

Sign off


Tassel Tutorial

Tassels are quick becoming the ‘in-thing’ right now! And good news is they are one of those things that are super simple to make, and they add a bit of fun to any project they are applied too!

I have tried a few different ways to make them – but this way is by far the simplest and easiest.

All you need for this Tip-Top-Tassel Tutorial is:
a skein of embroidery thread,
scissors,
and sewing needle (optional)

What to do:
The first step is cut two lengths from your thread. One approximately 15cm, the other 20-30cm (carefully do this to leave the rest of the skein wound nicely) These will become your ‘ties’.

Easy tassel tutorial using embroidery thread. DIY Tutorial instructions can be found on www.houseofnicnax.com.au #Tassel #tutorial #DIY

Now you need to find the mid way mark of you cotton, and slide the smaller of your ‘ties’ under. Tie it tightly.
Holding the ‘tie’ lift the whole thing up. The thread will fold in half and you will have the beginning of your tassel.

Then simply cut the loops at the bottom.

Easy tassel tutorial using embroidery thread. DIY Tutorial instructions can be found on www.houseofnicnax.com.au #Tassel #tutorial #DIY

Using the second piece of thread, tie this around the top of your tassel, then continue to wrap it around to form a neat top.

Tuck the loose thread under the wrapped thread to hold it in place.

Easy tassel tutorial using embroidery thread. DIY Tutorial instructions can be found on www.houseofnicnax.com.au #Tassel #tutorial #DIYAnd voilà! Your done!

So simple and fun!

Easy tassel tutorial using embroidery thread. DIY Tutorial instructions can be found on www.houseofnicnax.com.au #Tassel #tutorial #DIY

I made a few extras too, as I have LOTS of projects that I want to use them for!

Easy tassel tutorial using embroidery thread. DIY Tutorial instructions can be found on www.houseofnicnax.com.au #Tassel #tutorial #DIY

Have you created any projects using tassels? I’d love you to link them below!

Thanks for stoping by,

Happy Crafting!

Nic xx

#25trees Day 15 – Cookies!


IMG_8074

Well I must admit. Todays Christmas trees are the most yummiest Christmas trees of my #25trees project!
I wont lie to you. They are not healthy. Not even one little bit – and I cant even pretend that they are. BUT I can say they are super delicious and having ‘just one’ is not an option!

This is my most favourite biscuit recipe. It is actually the only one I use. And its great as it can be changed up by just adding ingredients (chocolate, sultanas, nuts, fruit etc)

So if you’d like to make them too – here’s the recipe.

Ingredients:
225g soft butter
140g caster sugar
1 egg yolk
2 tsp vanilla
280g plain flour

What to do:
Cream together the butter and sugar.
Add the egg yolk and vanilla.
Mix in the plain flour.
Roll out dough and cut out shapes.
Bake on 190deg for 10-15mins.

IMG_8075

**Tip – cook longer for a crunchy biscuit or less for a soft one! (I like them soft and chewy)

I think I’ll be baking another batch of these before Christmas, as I think Santa may enjoy one or two with his glass of milk!

Merry Christmas and thanks for stopping by!

Nic x

IMG_8073


#25trees Day 13

IMG_8027

I have always had a thing for garlands! They are so easy to make and can really add so much awesomeness to any event!

As part of my project to make 25 Christmas trees in the lead up to Christmas, I couldn’t resist making a little garland.

For most of my projects so far, I’ve had the items just laying around the house (yes, my craft cupboard is like a Mary Poppins bag and the supplies are endless!)
But for this little project I did need to visit the craft store. Originally I was thinking of just making it 2 tones of green – but then when I saw the sparkly glitter green – I had to add that into the mix too! (I love glitter!)
So my light and dark green trees are made of felt, but the glitter ones are actually foam.

IMG_8028

I cut 2 trees from each sheet.

IMG_8029

I then threaded the trees and felt balls onto my embroidery thread. I ended up using 7 felt balls, 2 more than pictured.

I tied a loop on each end to hang it from.

**Tip – balls and trees do not require securing. Being felt, they shouldn’t move along the thread without assistance.

IMG_8032

And that’s it! Really simple and quick to make! It would even be a great little activity to get the kids to help with these holidays!

What do you think?

Thanks for stopping by!

Nic x


#25trees Day 4

IMG_7792

Day 4 of my #25trees challenge!

These are my folded magazine Christmas trees.
Last year my mum made one of these – and I have wanted to make one since! They were actually a major contributor to me deciding to do the #25trees challenge!

They are really simple to make and all you need is an old magazine or book.
For this project I used an Avon Catalogue for the front tree (180 pages), the back left hand tree is an Ikea catalogue (280 pages) and the right hand side tree is a Coles recipe book. (this one is only a half tree – 40pages)

These trees were a bit of a family project as both mum and my oldest son (10yrs) helped to make them!

To make them – it is simply about folding the pages down into triangles.

Here’s the three stages –

  1. – fold the top corner of your page to the spine
  2. – take the diagonal piece and fold that down to the spine (making a ‘tie’ shape.
  3. – fold the overhanging point up into the triangle to form the base.
  4. – keep repeating this for every page in the book.

IMG_7802

For added decoration you could run a glue stick down the edges and sprinkle with glitter, or you could spray paint gold or silver.

I recently came across this awesome little blog post by Throne and Thimble. She too made these awesome trees and her post has a really great video tutorial on it! Check it out if your going to make them as it gives a bit more detail than I have!

Now – I must warn you – this is not a quick craft! The Ikea catalogue took nearly 2hrs! I do find it quite therapeutic though – so its best to do this when you have some uninterrupted time – or whilst you are watching TV!

If you have a go at this project – I’d love to see! Be sure to tag your project #25trees over on Instagram – or post me a link below!

Happy crafting!

Nic x

DIY Wall Hanging

Thread 7For my little project this week I decided it was time to brighten up my bathroom.

We have two bathrooms in our house – and I must say they are my least favourite places in the house. Why? I don’t know – maybe because I HATE cleaning them – but also because they are a bit boring. They don’t have personality like our other rooms. Continue reading

Pin Cushion Tutorial

Pin title

With all the sewing I do – I have a gazillion pins and needles, so I decided it was time I make myself some nice pin cushions!

This little project was super simple to do, it used up some of my scraps – and I can change it anytime I like!

If you would like to make them too – heres how: Continue reading